Showing posts with label recycle. Show all posts

Sunday, October 3, 2010

Bye, Bye High Waters

So I typically buy clothing off the clearance rack whenever possible. I mean come on who wouldn’t if you were saving a few bucks and after a few good buys you basically get one for free (my husband doesn’t see it like that). So I bought these cute light weight cotton pants for work. They were great for the summer heat. I am not pinning this on the husband but for some reason they all of the sudden got a bit too short to wear to work.


Yes, my legs spend most of the day under a desk but I don’t want to be the one strutting down the hallway with pants halfway up my ankles. So my solution…make them into capris! This is how I did it…super easy.

The first thing, take a pair of capris that are the ideal length that you are going for.


Then cut the high waters leaving two inches for the hem.  Fold over and iron the cut part ½-inch and then fold and iron leaving a 1-inch hem.


I like to iron all the folds and then sew it.


Then all you have to do is sew ¼-inch from the top of the new hem.


There you have it… new capris!!! (Please forgive the silly photo)


Happy Re-fashioning!

Wednesday, April 28, 2010

Flower Power Part I


I get inspiration for projects from just about anywhere. I scour magazines, catalogs, website, and stores looking for things that I can recreate with my own flare. This project came to me when I was shopping with some friends and one of them picked up a cute flower pin/clip and said this is cute. Of course I said "I can make that" (sounding just like my husband). So this is Flower Power Part I because I am planning a few variations but wanted to get the ball rolling.

You will need:
A few scraps of fabric (feel free to mix and match). I chose thick tweed from this blazer I picked up at Goodwill for $2.


Pin/Clip
Button
Thread
Hot Glue

Print out the pattern. Trace and cut eight petals on the fabric of your choice.
 

If the fabric you choose is lightweight and will not be as sturdy as you had hoped, use starch spray to stiffen the fabric. Next you want to take a petal, pinch the small end, approximately 1-inch from the end, and sew an X securing the two sides together. I crossed the X about 4 times for each petal. Next cut approximately a 1/2-inch off the end creating a flat end.


Once you have all the petals stitched and cut you are ready to put them together. Take the petals and start your stitch through the X of one petal, loop around the flat end of the petal and back through the X you just started with, next thread the second petal, going through the X and again loop around the flat end and go back through the second petal X. Continue this process until you have all eight petals strung. Remember to keep the thread tight. Once all the petals are strung tie off the tread securing the circle. The flower may be a bit floppy, don't worry.

Next take the hot glue gun and put a bead of glue between the petals as close to the X as possible. You can also add a small bead of glue near the top of the petal to secure the petals.


Once all the petals are where you want them put a small bead of glue in the center and place the button. Flip the flower over and glue the pin/clip onto the back and away you go!


Enjoy!


 Sammy Gene

Thursday, April 1, 2010

Running Shoe Re-new


I have been holding on to my old running shoes with the intention that someday I will wear them until they are completely shot, but in reality I only need one extra pair to mow the grass in. I recently got a snazzy new pair of running shoes and realized that it was time to purge. So I kept: my new pair (treadmill ONLY), the last pair I bought (outside running), and ONE old pair for mowing and yard work (ha like I do any of that). That leaves me with four (yes, four) pairs of running shoes to be disposed of. Now anyone who knows me, knows that I am not going to just throw them away! Usually I make regular donations to the local Goodwill when I have wearable items, but this time I decided to do something a little different. I found this wonderful organization, One World Running, which will send running shoes to people in need around the world. If the shoes are deemed too worn (to be worn) they are sent to Nike's Reuse-a-Shoe program instead, and wind up paving a playground. It's a win-win in my mind.
Sammy Gene

Monday, March 22, 2010

All Business


I went to a business meeting on last week and it was the kind where you chit-chat and smooze. So I was working the room (hahaha yeah right) and the time came when I had to give someone my business card and out I pull a stack of cards held together with a binder clip. I felt kinda tacky in a weird way as I fumbled to unclip the cards. After that experience I started thinking about it and an idea just popped in my head when I was getting a piece of gum out of my desk drawer. Bam, it hit I could use the gum package as a template. After digging for awhile I found supplies that I had in my craft closet already.

Glue (spray and tacky)
Scrap of fabric
Hair tie
Scissors
Something to measure with

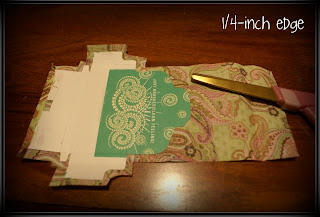
First I took the gum package apart, very carefully, so it was laying flat. I used spray glue and sprayed the outside of the package and laid it flat on the material and placed a book on top for a few minutes to allow it to adhere and dry a bit.  Once I had the template and the material glued together I cut around the template leaving a ¼-inch overhang.


Then I used the tacky glue and glued the sides in and manipulated the corners where necessary. I did snip the tight corners in order to get a nice straight edge. I placed a book on top again and let it dry for a few more minutes.


 While giving the glue time to dry I cut a piece of fabric to line the inside flap in order to make the card holder look finished. My husband mentioned to me I should have stitched around the edge before gluing it back in the shape of the gum package and I think that was a good idea but that was after I already glued it together. So if you have the time run a stitch around the edge to help hold everything together and then glue the package back into the original shape.


You may have to hold it together for a few minutes to let the glue set. After letting the glue dry I added an eyelet in the center of the front flap.


Then thread a hair tie through and snip off the inside loop and singe the end to create a ball at the end so the tie cannot go back through the eyelet.


There you have it, a fashionable business card holder.


Just think you can make one for every season, holiday, or event you go to! This would also be a fashionable way to carry gum!! Remember it is a pack of gum no big loss if you have to try a few times.

Sammy Gene

Sunday, March 7, 2010

Re-Store Your Lights

Do you ever get tired of the shiny contractor grade fixtures in your house? Well I have had it! They just don’t match my style, so I have taken it upon myself to correct the matter for as little cost as possible. This first item on my hit list… the vanity lights in our guest bathroom (after all this is the bathroom closest to my craft room). I really like the vanity just not the light fixtures!

After going to home store after home store looking for the perfect replacement lights to illuminate our guest bathroom I came up with one conclusion – It doesn’t exist. Well I guess I shouldn’t say it doesn’t exist, I should say it doesn’t exist in our budget. Yes I could go to a specialty shop and special order the perfect lights, however that comes with a high price. Now I am not saying that I won’t eventually take that step but I needed a quick (cheap) fix. So, after a bit of hunting I found the perfect replacement lights (globes included) at a Habitat ReStore. I have visited this shop for-a-cause on a few occasions usually to donate some items and then I drag my poor husband through the store until I have looked in every little corner(I wouldn’t want to miss the perfect refurbish). Now, with my love of refurbishing existing items, I was looking for globes that were different from the typical run of the mill home store version (our half bath has he only ones I liked and I don’t want every room to look the same). Well as luck would have it I found the perfect light fixture and globes in one piece (I liked the globes more then anything). Downside-IT’S WHITE. Upside-The whole light (fixture and globes) ONLY COST $6!! Now that is a steal! I did a little research once we made our big purchase and found the same exact light (chrome) at a home store and it cost wait for it… $49 (and that was with UGLY globes, new ones cost upward from $6 each)!!!!!! I think this was a GOOD purchase!


Let the modifications begin. First I started by removing the globes and covered the sockets with newspaper to prevent the paint from getting on the white portion of the socket.


Now for my big secret!! My new favorite item I cannot leave the home store without… CHALKBOARD SPRAY PAINT! Sounds odd to put this kind of paint on a light fixture however, the finish comes out flat and looks very similar to wrought iron. After prepping the fixture I moved on to the fun part… getting my spray on. I applied a few coats of paint to get full coverage.


After the fixture was fully covered in paint I moved onto the screws. Typically painting screws is not so easy, you know holding the screw and then you get paint all over your hand, I came up with the idea to stick the screws into Styrofoam and then paint!

And TaDa!!! New Vanity Lights!!


Connecting the fixtures to the wooden panel was easy, there was a nut that holds the fixture in place. I do have to admit my husband did do all the electrical work (he is a very handy man to have around). I really like how the lights turned out. They compliment the remodel very well. In total I spent approximately $12 ($6 on the light and $6 on the paint). Spray paint is my favorite quick (cheap) fix. Look for more spray paint fixes in blogs to come!

Sammy Gene Y