Sunday, October 3, 2010

Bye, Bye High Waters

So I typically buy clothing off the clearance rack whenever possible. I mean come on who wouldn’t if you were saving a few bucks and after a few good buys you basically get one for free (my husband doesn’t see it like that). So I bought these cute light weight cotton pants for work. They were great for the summer heat. I am not pinning this on the husband but for some reason they all of the sudden got a bit too short to wear to work.


Yes, my legs spend most of the day under a desk but I don’t want to be the one strutting down the hallway with pants halfway up my ankles. So my solution…make them into capris! This is how I did it…super easy.

The first thing, take a pair of capris that are the ideal length that you are going for.


Then cut the high waters leaving two inches for the hem.  Fold over and iron the cut part ½-inch and then fold and iron leaving a 1-inch hem.


I like to iron all the folds and then sew it.


Then all you have to do is sew ¼-inch from the top of the new hem.


There you have it… new capris!!! (Please forgive the silly photo)


Happy Re-fashioning!

Thursday, August 26, 2010

Roaring Good Time


WOW a month went by that fast. In that month I managed to visit family every weekend, attend a birthday party (or two), spend a week at the beach with my entire family, and work. So please forgive me for my delinquent blogging and rest assure that I will try and make it up to everyone. So let me start with the birthday party. I spent several long nights melting and wiping and freezing and you get the point, to create these delicious treats for Baby B's first birthday party.


They were super simple to make however I should have bought a few molds and things would have progressed a lot smoother faster. All I did was buy two molds one from JoAnn's and one from Hobby Lobby, the melting chocolates and a squirt bottle kit (also from JoAnn's). To melt the chocolate all you have to do is place chocolates into bottles and put them into microwave for 30 seconds on half power. I had to do this a few time until the chocolate was completely melted to the perfect consistency. Next squirt the color of chocolate into the mold where appropriate, bump against the counter a few times, and then stick it into the freezer for a few minutes until the chocolate hardens and then add the next color layer. There you have it, pretty simple right? So then I found the second mold but this one took Oreo cookies in the center. Can I just say yummy yummy! Same process but just stick the Oreo in the center after the last layer of chocolate. I also made chocolate covered pretzels, again super easy. I actually melted the chocolate just the same and then took the cap off the bottle and just dipped the pretzel rod into the chocolate. I dipped a few into coconut for an added flare.

I also wanted to share the awesome cake my crafty sister created for Baby B.


She used her Cricut to cut the animals out and used them as a template. We also made super cute cupcakes following the Better Crocker directions.


The party was a success and was followed by a relaxing week at the beach. I Love the BEACH!!!!

Friday, July 9, 2010

Bag the Bags


Does anyone else have a mess like this?


No matter how hard I try to Go Green and reuse bags I still end up with more than my fair share, it's the quick trips into the store that get me. My goal is to go plastic bagless in 2011, we shall see how that pans out. In the mean time I needed some way to control the over abundance. I've seen various versions of bag control in the kitchen or storage sections at various stores. I decided that I wanted to try and make the bag bags you see at craft shows and I think they even have them at Wal-mart (my memory fails me again).

What you need:
Sewing Machine
18"x16" piece of material (I chose a heavy upholstery fabric)
2"x4" piece of material
Matching thread
Thin elastic (3/8")
Elastic grippers (see below for picture)
Bags

First you want to sew a 1/2" hem into one of the 16" ends. Usually I will sew a 1/8" hem and then fold it over to a 1/2" and sew again to finish it.


Then we move onto the elastic portion. You basically do the same thing creating a pocket for the elastic to go into. So first sew 1/8" hem then fold that over leaving enough room for your elastic to lay flat when it is inside the pocket. Sew the second hem in. Now you are ready to use the elastic grippers (this is not the technical term for these but it is what I call them). They are simple to use, simply grip one end of the elastic with the grippers. Stick the end of the grippers into the "pocket" you created and pull the elastic through being careful not to twist the elastic.


Now this is where my opinion comes in more than technical skill. I like to pull the elastic all the way through until the end of the strip is at the starting end of the "pocket" (unless your piece of elastic is way too long, then you would just have to cut it smaller). When the end of the elastic is lined up with the end of the "pocket" sew perpendicularly across the elastic to secure is on that end. Continue to pull the elastic through. Once you have pulled it through you will want to gage how big you want the opening at the bottom of the bag.  I just wrapped the material around until I got the ideal opening and then sewed perpendicularly across the elastic, securing it. Once you have the two 16" ends finished you are ready to sew it up the side. With the right sides of the fabric facing each other sew down the edge leaving about a 1/4" to a 1/2" seam.


As you can tell by now I am not too precise with measurements. Now you are almost done all that is left is sewing the hanging loop. Take the 2"x4" piece of material and fold the two long sides into the middle so they are just barely touching. I usually take a hot iron down the fold to make them stay perfect.


Then if you did it right you should be able to fold that in half again, run the iron down the fold. I like to sew down both side about a 1/8" from each side. Last step is to sew the loop into the bag. Take the 4" strip and fold it in half, place on the inside of the bag covering the last seam you sewed, and sew perpendicular across the strip. Sew in two lines to make it super secure. There you have it a simple bag bag.


Happy Bagging!

Sammy Gene

Friday, July 2, 2010

July Coupon Sammy


Ok my new goal is to post coupon updates once a month preferable in the beginning. Let's see where that takes us. Just so everyone knows I am addicted to coupons! Some may think it is a waste of time however saving $85, my last shopping trip is much more than I get pain an hour. Now that was an extreme trip (saving 50%) but it just goes to show that it is possible. I know there are people out there that do much better than that even and if so please share your tips!!!! As I mentioned in previous posts I buy the newspaper every Sunday and usually trade with a few of the girls at work. With that said and the holiday coming up I want to remind everyone that this Sunday is July 4th and from my research there will be no coupons in the paper- just an FYI. Ok so here are links to a few of my favorite coupon spots plus some direct links to coupons that I get via e-mail.

Coupons.Com
Smart Source
Red Plum
Nestle
Classico
Tide

Happy Couponing!

Sammy Gene

Tuesday, June 22, 2010

A Jam Good Time


I realize that there a lot of posts out there on how to make jam but I wanted to share a few of my, well let's just call them calculated mistakes. I am a Splenda junkie, now I know there is some controversy on Splenda but I LOVE, LOVE, LOVE it. With that said I was wanted to make a low sugar/no sugar jam that everyone in my family could enjoy whether they can't have sugar or they are anti-Splenda. I found this great pectin that said on the package "No Sugar Needed Fruit Pectin" which was exactly what I was looking for. I started by picking 4 quarts of strawberries from a local farm that had pick-your-own. I was a bit late in the season but I managed to find the ripest, freshest strawberries left in the well picked patch.


I started by capping (cutting the green top off) the strawberries and mashing them with a potato mashed until they reached the chunkiness I like in my jam.


Once I had the strawberries all mashed up I turned to the directions on the package for freezer jam because I think that it taste so much fresher from the freezer. After reading the directions on the package I saw this little box in the corner and after looking at it I realized it was guidelines for adding sugar… hmmm. So I decided I was going to try the honey substitution and then I made a few batches with no sugar. I ended up making A LOT more jam then expected but I am very excited to have strawberry jam in January. A few tips from my experience in jam making.
  1. Clean and dry all your jars/containers before starting the cooking process.
  2. Follow the directions exactly, including the exact amounts of ingredients.
  3. Fill the jars, leaving ½" for expansion in the freezer.
  4. Clean the rim with a damp cloth to allow for the best seal to keep in the freshness
  5. KEY TIP!!!! Only make ONE (1) batch at a time. Doubling the recipe could prevent the jam from setting properly.
  6. ENJOY!

Happy Jamming!

Sammy Gene

Tuesday, June 8, 2010

Hedgey Hedge-Hog


I know this one is late but I have been a bit preoccupied with an addition to our family… Stella our newest family member is quite a handful and needs lots of playtime and attention.


So on with the crafty post. The past few holidays I have struggled with what to get my nephew because he isn't at that age where he needs/wants cool toy or toys that his mommy wouldn't appreciate (they come later when he has full range to bang and make a racket).  I decided that I was going to start using my crafty skills to create a gift for him that was age appropriate.  After skimming through mountains of blogs I found the cutest pattern for a stuffed hedge-hog at Matsutake.  I have never made a stuffed animal before but I was sure that this one was manageable and could be done in a reasonable timeframe before Easter (I know this is overdue but it is good for anytime).

 
You need:
Sewing machine
½ yard soft snuggly fabric
Matching thread
Stuffing
Pattern


Directions:
The first thing I did was print trace the pattern. I found it much easier to lay my lap top on its back and trace the image right off the screen. Please Please Please be super careful when doing this I wouldn't want any screen destruction to happen per my instructions. Next trace and cut two body pieces and one bottom piece. Then you want to cut the ruffle strips. I cut four 1-inch by 24-inches strips of fabric and four 1-inch by 12-inches strips. Once you have all the pieces to the puzzle you are ready to sew.


First you want to sew the two body pieces together, outsides facing in, leaving a 1/16 hem. Next you want to sew the bottom on. Now this was the tricky part and I had to visualize it a few different ways. You know how they say measure twice cut once, well it is the same with sewing.


Once you get the bottom on, stuff the little guy, and sew the stuffing hole shut, you are ready to move onto the ruffles.


Sew a running stitch (loose long stitch) down the middle of the strip. Sew all eight strips this way. After all your strips have running stitches you want to pull the loose string creating as much ruffle as you desire. I used the stuffed body to gauge how long I needed the ruffles. Tie a knot at both ends of the ruffle to secure. The last step is to sew the ruffles on. I secured the ruffles on with pins and hand stitched the ruffles on. Add eyes and a nose with black thread or small buttons (I did not use buttons due to the age of Baby B).


Isn't he sooooooo cute. P.S. his onesie says "My Aunt Rocks"… that's me!!!

Happy Sewing!

Sammy Gene

Thursday, May 27, 2010

Stamp Wall Art


After digging and digging and digging through the shoe box lids I stored my stamps in I decided I needed to upgrade. The show boxes served their purpose however I got to the point where I spent more time digging and looking then I did actually stamping. I am a sucker for the $1 stamps at Michaels so I have accumulated a lot over the past few years.


So for this project I turned to the husband (he is handy to have around). We brainstormed a bit and I explained to him what my thoughts were and the process began.

What you will need:

Materials
2"x1" Pine or Poplar (typically comes in 8ft lengths at Home Depot)
Finish Nails (small nails)
Wood Glue
Wood Putty
Paint
12"x12" scrapbook paper

Tools
Miter Saw (hand miter saws cost about $20 at Home Depot)
Tape Measure
Router
Hammer

What you do:
First you want to decide on outside dimensions (I chose 12"x12"), cut the outside pieces of the box so that they meet at 45 degree angles (using a miter saw). Next you want to decide where you want your shelves in the box. If you can, cut approximately 1/8 inch deep slots into the sides to receive the shelves using a router, miter saw, or table saw if you have one. Cut your shelves to lengths so they fit in the slots between the sides or simply between the sides.


Using wood glue at all the contact points, put 2 finish nails at each joint and use a punch to sink the heads just below the surface. You may need to pre-dill if your wood splits. After your glue has dried you are ready to route the edges. I used a 1/8 inch radius rounding bit and just did the inside edges. You do not have to route the edges if you don't want to of don't have a router. Use the wood putty to fill and cracks in the joints and nail holes (simply apply with your finger tip). After the putty has dried sand it smooth and add more if needed.


Now all you have to do is paint and the shelves are complete! I added a 12"x12" piece of scrapbook paper as the background with the thought that they can be changes or replaced if it gets inked up. To add the paper I simply ran two-sided take down the back of the shelf and applied the paper.


Hanging your shelves:
There are several options for hanging your shelves since they won't be holding much weight. Most picture hanging systems should work. I chose to route a key hole pocket into the top of each side. After that it is as simple as hanging the shelves.


Sammy Gene

Tuesday, May 18, 2010

Seeds Stored Right


Now that all our seeds have been planted and we have decided that we have way more starter plants than our tiny garden can support we are finally ready to put the seed to rest for awhile (or until we decide to go for a second round of some summer crops). I have looked into seed storage and wanted to share a few tip with everyone on how to store seeds. What I found was that there are no exact answers, seeds are living things, so eventually the will no longer be viable. There is no-drop dead point for the seeds, the percentage of them germinating just lessens with time.

 
There are three enemies of seeds; moisture, heat, and fluctuating temperatures. So to keep those seeds super dry place the packets into an air tight container, to keep the seeds away from heat and at a constant temperature stick the container in the refrigerator or a cool dark location that will not be impacted by fluctuating temperatures. Leaving your seeds in the shed is the worst place to store them simply because that allows moisture and temperature fluctuations to impact the tiny little guys.

 
After a bit of research these are the holding times that seem reasonable for seeds as long as they are properly stored in a dark and dry location that has a consistent temperature.
  • 1 year - Sweet corn, onion, parsnip, okra, parsley
  • 2 years - Beet, pepper, leek
  • 3 years - Asparagus, bean, carrot, celery, lettuce, pea, spinach, tomato
  • 4 years - Cabbage, cauliflower, Brussels sprouts, Swiss chard, kale, squash, pumpkin, radish, turnip, rutabaga
  • 5 years - Cucumber, endive, watermelon
Happy Seeding!
 
Sammy Gene

Tuesday, May 11, 2010

File All Your Paperwork Here


I am not MIA however I did leave my camera cable in PA so that should explain no posts in over a week. Well the husband and I have been looking for quite some time for the perfect filing cabinet. Guess what? They are all U-G-L-Y or cost $200. As luck would have it my MIL was purging her house of all her sons (my husbands) belongings and she said take that filing cabinet its ugly… and that is how we ended up with an ugly filing cabinet (free, which makes it kinda ok). Then came the challenge of how to make it not so ugly. It all started in the paint isle and the monster grew from there… So here is how I went from drab to fab…


Step 1
Remove the hardware and the lock bar (at least that is what I am calling for the purpose of this blog).

Step 2
Tape off any area that you do not want painted.


Step 3
Use a very fine sand paper and scuff up the existing paint and sand chips in the paint or miscellaneous bumps.

Step 4
Wipe down the cabinet with a micro-fiber cloth to pick up all the paint dust and small particles.

Step 5
Apply a thin coat of the paint of your choice. I used a foam roller and got a perfect smooth texture if you want paint with more texture check out the different options of rollers.


Step 6
Let dry for 6-8 hours then apply a second coat. Repeat this step until you reach your desired color.

Step 7
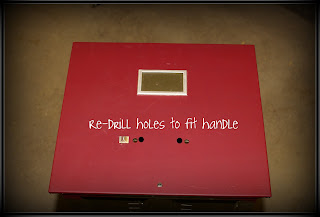
Once you have the cabinet painted you are almost done, all you have left is replacing the hardware. First measure up the old hardware with the new and see if the holes will match if not you may have to re-drill holes to fit your new handle. If you need to re-drill the holes, make a template to get the position right.


Step 8
Apply handles and file away!


Sammy Gene

Friday, April 30, 2010

Coupon Sammy


I just thought I would share some of the great coupons I have been finding on-line!
Olay Quench Mail-In Rebate (I know it sounds like a hassle but come on it is free!)
Scrubbing Bubbles Products
Windex Products
Red Plum Coupon Site
Aveeno
Ortega Salsa
Keebler Pecan Sandies (Shortbread Cookies)
I know a mixed matched bunch of coupons, but hey savings are savings!
Sammy Gene

Wednesday, April 28, 2010

Flower Power Part I


I get inspiration for projects from just about anywhere. I scour magazines, catalogs, website, and stores looking for things that I can recreate with my own flare. This project came to me when I was shopping with some friends and one of them picked up a cute flower pin/clip and said this is cute. Of course I said "I can make that" (sounding just like my husband). So this is Flower Power Part I because I am planning a few variations but wanted to get the ball rolling.

You will need:
A few scraps of fabric (feel free to mix and match). I chose thick tweed from this blazer I picked up at Goodwill for $2.


Pin/Clip
Button
Thread
Hot Glue

Print out the pattern. Trace and cut eight petals on the fabric of your choice.
 

If the fabric you choose is lightweight and will not be as sturdy as you had hoped, use starch spray to stiffen the fabric. Next you want to take a petal, pinch the small end, approximately 1-inch from the end, and sew an X securing the two sides together. I crossed the X about 4 times for each petal. Next cut approximately a 1/2-inch off the end creating a flat end.


Once you have all the petals stitched and cut you are ready to put them together. Take the petals and start your stitch through the X of one petal, loop around the flat end of the petal and back through the X you just started with, next thread the second petal, going through the X and again loop around the flat end and go back through the second petal X. Continue this process until you have all eight petals strung. Remember to keep the thread tight. Once all the petals are strung tie off the tread securing the circle. The flower may be a bit floppy, don't worry.

Next take the hot glue gun and put a bead of glue between the petals as close to the X as possible. You can also add a small bead of glue near the top of the petal to secure the petals.


Once all the petals are where you want them put a small bead of glue in the center and place the button. Flip the flower over and glue the pin/clip onto the back and away you go!


Enjoy!


 Sammy Gene

Monday, April 19, 2010

Taco Soup


Mexican is my all time favorite type of food. So when in a pinch I love to create with my taco seasoning. What you will need:

 
2 cups shredded chicken (rotisserie or precooked)
1 jar salsa (any kind)
1 jar taco sauce (or tomato juice whichever is handy)
2 cups frozen corn
A few shakes of taco seasoning (to taste)
A few shakes of chili powder (to taste)
2 avocados
1 lime
1 cup sour cream, plus a few scoops for garnish
Shredded cheddar cheese

In a large pot over medium high heat add chicken, salsa, taco sauce (save a table spoon for guacamole), and corn. Let the ingredients simmer for a half hour, then add the taco seasoning and chili powder to taste, one cup sour cream, and cover for another half hour. In the meantime cut the avocados. In a small bowl add taco seasoning, a tablespoon of taco sauce, and a tablespoon of lime juice mix and stick in the fridge. Back to the soup, if the 'soup' is not soupy enough add a little tomato juice to loosen things up. After all the flavors have had time to merge you are ready to serve. Scoop soup into a bowl and garnish with the guacamole, sour cream, and cheddar cheese.


On this beautiful evening I also made some ice coffee for the Hubby and myself! Yummmmm

Oh and the tater-tots, that is where the meal planning process started so I felt the need for follow through (as mentioned before I am not planner)! Happy eating!

 
Sammy Gene

Thursday, April 8, 2010

Lacey Lacey Appliqué


Everyone has those tanks in their drawer that you wear as layers or just throw on for a day of running errands. Well I have a ton, why you ask? Well every time I see one on sale I pick it up so I have a rainbow of tanks and I got this one for $3.98 at Target!!


I got a wonderful idea from Disney at Ruffles and Stuff to do a lace appliqué on the tank to spice it up a little and make it more than just a simple tank.

So first thing first find a lace pattern that you would like to use as an embellishment and then cut out the piece (larger than the actual design). I had an old lace table cloth that I don't use anymore (huge stain right in the middle) for the perfect pattern.

Then you want to take a piece of wax paper, the lace, and Heat-N-Bond (paper side up), in that order and place a medium heat iron over the stack for a few (2-3) seconds. Take a peak and see if everything is properly 'glued' together.


The hard part is over! Now cut around the lace design.


Once you have your design cut you are ready to apply it to the tank. It took me a few maneuvers to figure out exactly how I wanted the pattern to lay. Then it is time to iron again… I like to put wax paper between the iron and the appliqué to avoid any stickiness transferring to the iron and iron for a few more (8-10) seconds until everything is secure. Another hint when using wax paper, shiny side down.


And you just crafted yourself a simple new tank top for the warm weather to come, and if you live where I live you will be wanting to wear this tank now!!! Let's just say it went from Winter to Summer here!!!

Sammy Gene